

Settings → Custom Status in your OpenCX dashboard. Creating, editing, and deleting statuses requires the Custom statuses permission under Settings in Settings → Roles. Every inbox agent can see the statuses and apply them.
How custom statuses relate to built-in statuses
Every custom status sits under one parent, shown in the Counts as column:
A session carries at most one custom status. Applying one moves the session to its parent status. Choosing a built-in status from the same menu removes the custom status. A custom status under a closed parent closes the session with the same rules as a normal close, including any Structured Fields your workspace requires before closing.
Create a custom status
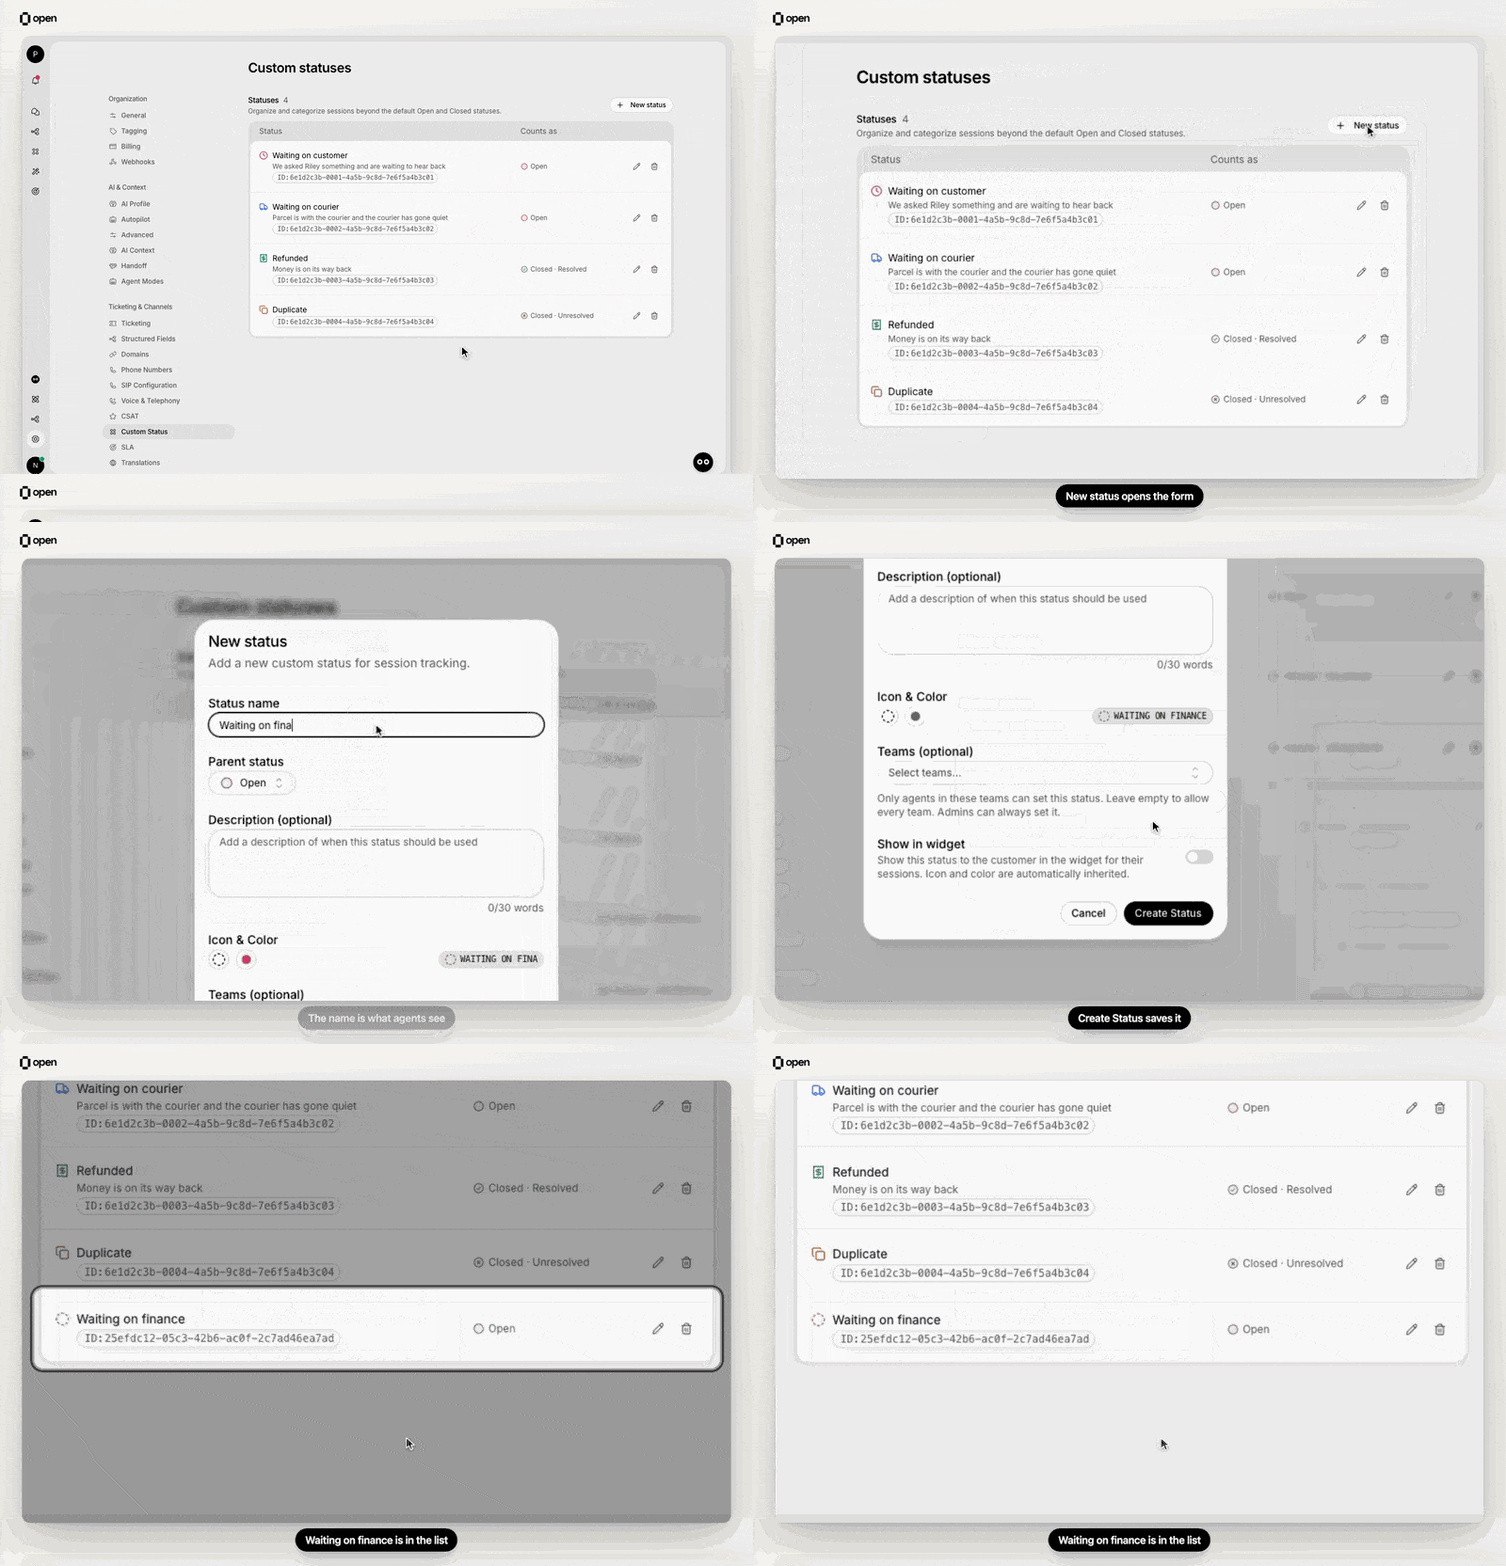
Add a status under Open, click Create Status, and it shows up in the list.
1
Open Settings → Custom Status
Go to Settings → Custom Status and click New status.
2
Name it and pick a parent
Enter a Status name, for example In Progress, and choose the Parent status. The name is what agents see in the inbox.
3
Describe when to use it
Add an optional Description of up to 30 words. It is for your team only and is never shown to customers.
4
Choose an icon and color
Under Icon & Color, pick an icon and a status color. The color starts as the parent’s color until you change it. The preview chip shows how the status looks in the inbox.
5
Limit it to teams (optional)
Under Teams (optional), select the teams whose agents may set this status. Leave it empty to allow every team. Admins can always set it.
6
Create it
Click Create Status. The status is available in the inbox right away.
Apply a status to a session
- Status menu. In a session, click the status badge in the session header. The menu lists Open, Resolved, and Unresolved, each followed by its custom statuses. Pick one to apply it.
- Send and set status. Admins can add custom statuses to the Send menu under Settings → Workspace → Replies → Send and set status. Agents then see Send and [status] beside Send and resolve and can reply and apply the status in one action. See workspace settings and Send and set a custom status.
- Workflows. The Apply Custom Status workflow action sets a status on a session.
- API. Set or clear a session’s custom status.
Statuses limited to teams
When a status has teams selected, agents outside those teams do not see it in the status menu or the Send menu, and the server refuses the change with This custom status is restricted to specific teams. A session that already carries the status still shows it to everyone. Admins, workflows, and API keys can always apply it.Show a status to customers in the widget
Turn on Show in widget to show the status to the customer for their sessions. Fill in Display name (up to 100 characters) and Display description (up to 30 words); both are required while the switch is on. The widget uses the status icon and color. Changing this switch requires the Channels settings permission. Each status row shows the status ID; copy it to match the status when customizing your widget.Sync statuses with your helpdesk
When your ticketing system is Zendesk, HubSpot, or Salesforce, map each custom status to a status in that system.1
Sync the other system's statuses
Click Sync from Zendesk, Sync from HubSpot, or Sync from Salesforce. The mapping column (Zendesk custom status, HubSpot ticket stage, or Salesforce case status) appears after the first successful sync. Sync from HubSpot appears once you have at least one custom status.
2
Check the automatic links
Each sync links unlinked OpenCX statuses to an active status with the same name and a compatible open or closed state. Links you already set are kept.
3
Correct links by hand
Use the picker in the mapping column to choose a different status, or Not linked to remove a link. A linked status that disappeared from the other system shows as not in roster until you sync again or relink it.
Find sessions by custom status
- In the inbox, add the Custom Status filter to list sessions in a given status. Save it as a view to return to it.
- In Filters → Group by, choose Custom status. Sessions without one appear under No custom status.
Edit or delete a status
Choose Edit on a status row to change any field. A new name, icon, or color shows everywhere the status appears. A new parent applies the next time the status is set; sessions that already carry it keep their current open or closed state. Moving a status between an open and a closed parent removes its HubSpot and Salesforce links, so relink it afterwards. Choosing Delete removes the status immediately, without a confirmation step, and cannot be undone. Sessions that carried it lose the custom status and keep their built-in status. The status also drops out of the Send menu.Troubleshooting
Related Documentation
Workspace Settings
Add statuses to the Send menu.
Inbox
Statuses, filters, and grouping in the inbox.
Teams
The teams you can limit a status to.
Custom Statuses API
Manage statuses programmatically.