

Shortcuts work for every member. A command or search in the menu appears only when your role can open the page or take the action behind it. Changing the send shortcut requires write access to Helpdesk settings in Roles.
Open the command menu
Press ⌘ + K / Ctrl + K to open or close it. With nothing typed, it lists:- Actions for what is on screen, such as the open session, contact, workflow or AI action, followed by the current page’s Shortcuts.
- Navigation: a Go to … row for every dashboard page you can open.
- Organizations: every organization you belong to. Pick one to switch; the current one is marked Current.
Open pages that are not in the sidebar
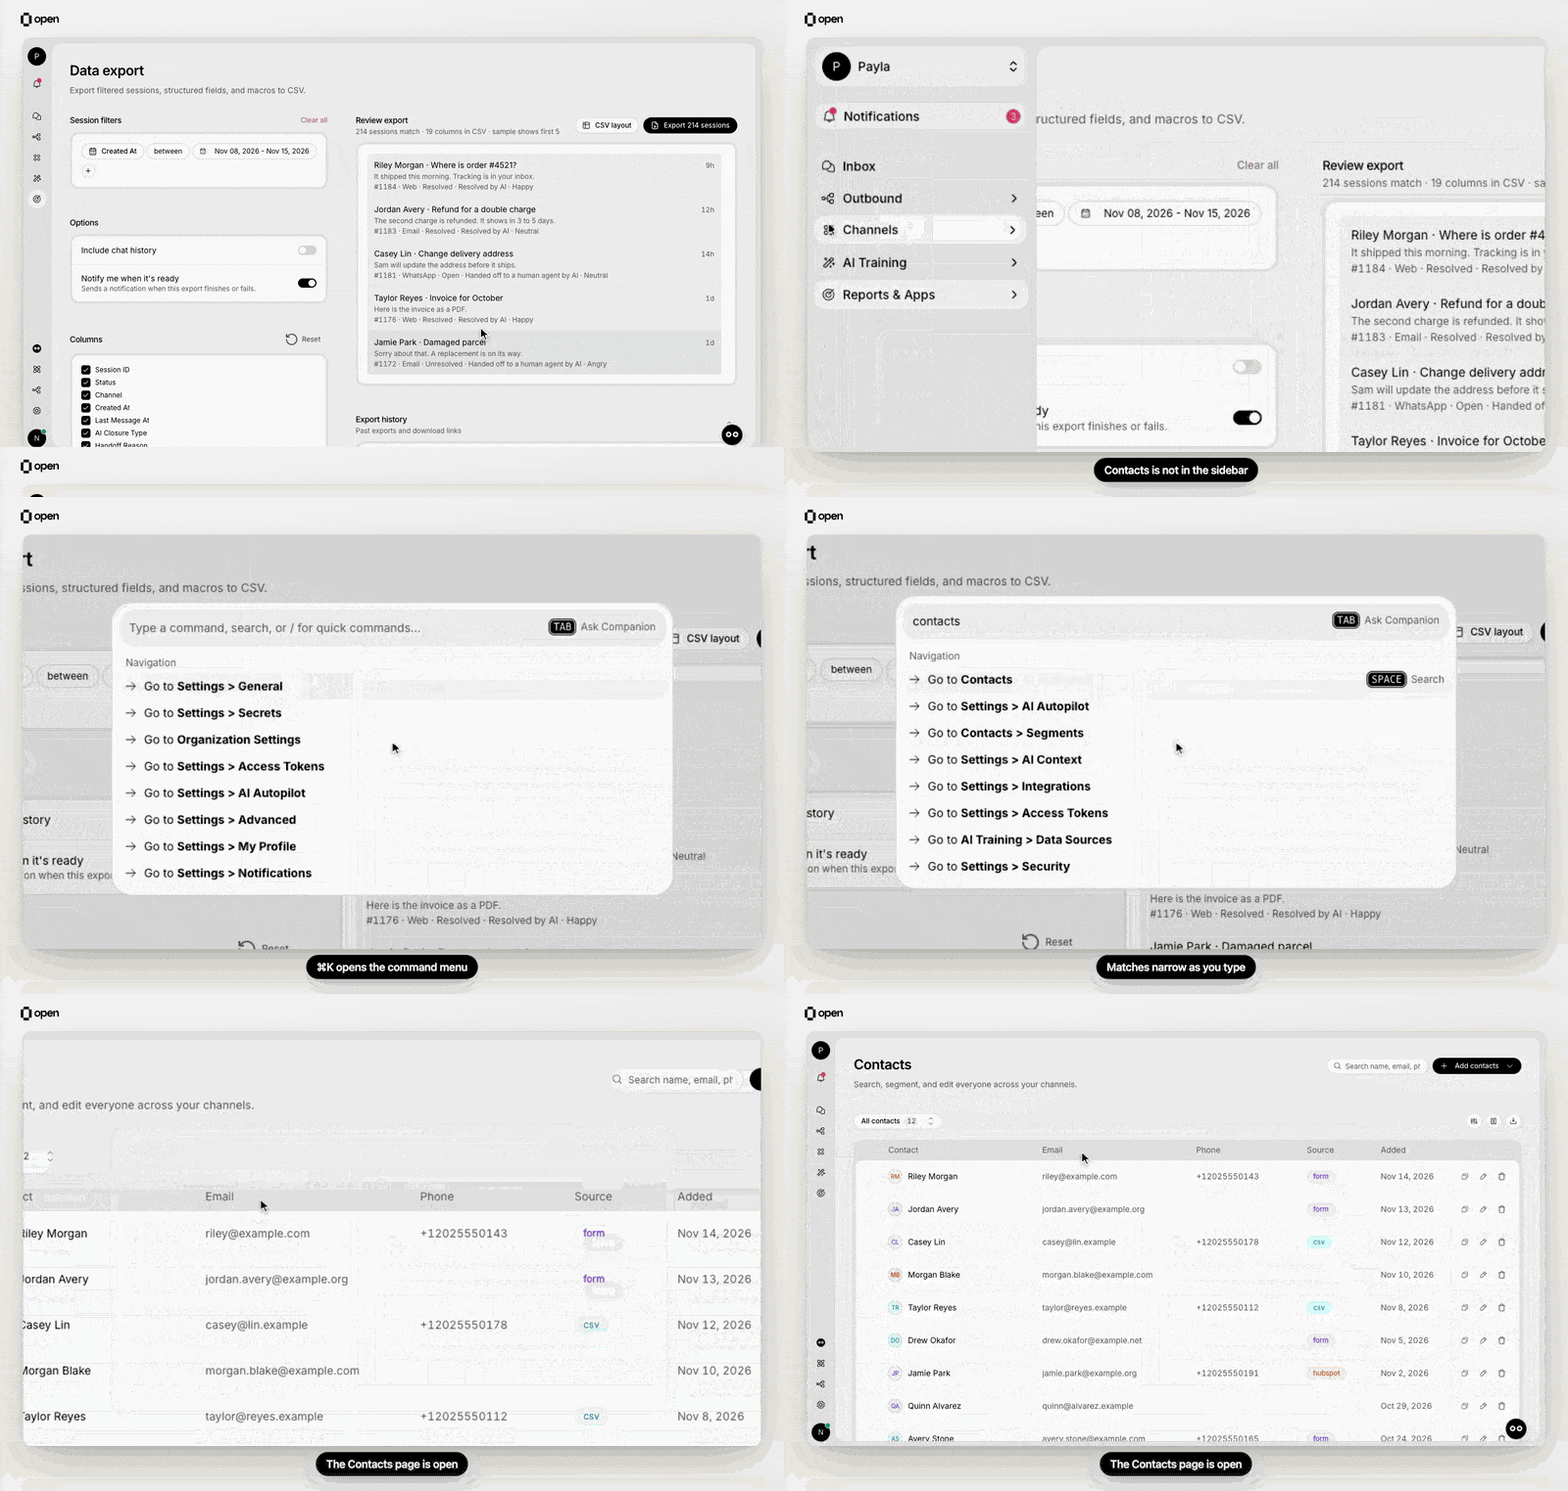
Contacts has no sidebar entry: press ⌘K, type contacts and select Go to Contacts.
Search sessions, contacts and more
Type / to see quick commands, or highlight a Go to row and press Space to search that page’s records.
In /sessions, type
key:value to search a session attribute, for example OrderID:4821, or -key:value to exclude it. Press ⌘ + Enter / Ctrl + Enter to open the results as a filtered inbox view.
Act on what is open
An open session
An open session
Assign to…, Assign to me (or Take over when the AI keeps the session), Resolve session or Reopen session, Change status…, Move to team… (when your workspace has support teams), Edit tags…, New sub-session…, View contact history and Open contact profile. Pickers such as Assign to… open inside the menu; press Backspace on an empty search to go back.
A contact, workflow, AI action or phone agent
A contact, workflow, AI action or phone agent
Contacts: New session with this contact, Copy email, Copy phone number, Open contact profile, Block contact or Unblock contact, and Delete contact. Workflows: Activate this version or Deactivate this version, View runs, Duplicate workflow, Copy link and Delete workflow. AI actions: Test action, Action settings…, Copy link and Delete action. Phone agents: Copy phone number, Copy agent ID, Copy link and Delete phone agent.
Instructions and the AI profile
Instructions and the AI profile
Instruction settings…, Test instruction, Publish instruction and Unpublish instruction; Publish AI profile and Test AI profile.
List pages and global actions
List pages and global actions
New session in the inbox, Add contact on Contacts, Invite teammate on Settings → Members, Create tag on Settings → Tagging, and, for admins, Create Organization on any page.
Change the theme or ask Companion
Type “theme” to find Change theme…, then pick Light, Dark or System. Appearance settings… opens Settings → Personalization. If you can use Companion, press Tab to send what you typed to Companion as a question.Keys inside the command menu
Shortcut reference
Shortcuts that use a single key, such as M or V, do nothing while you are typing in a text field. Shortcuts with ⌘, Ctrl or ⌥ / Alt also work inside text fields. The command menu’s Shortcuts section always lists what the current page offers; select one there to run it.Anywhere in the dashboard
Inbox
Optimize mode shows a focused summary of a handed-off session instead of the full timeline.
Other pages
Dictate with your voice
Click into any text field, such as the composer, a comment box or a search field, and press ⌥ + M / Alt + M. The screen edge glows while OpenCX listens and your words appear as you speak. If the field has its own microphone button, the shortcut starts that one. Dictation is available to every member. Stop with ⌥ + M / Alt + M again or Esc. Fields without their own microphone button also show a stop button in the bottom-right corner. If no field is focused, a message asks you to click into one first. Say these commands as their own sentence, with a short pause after:
Punctuation is added for you, so you don’t need to say “comma” or “period”.
Choose which key sends a message
By default, ⌘ + Enter / Ctrl + Enter sends in every channel. To send with Enter instead, open Settings → Workspace → Replies in your OpenCX dashboard and pick channels under Send message shortcut. The choice applies to everyone in the workspace. In those channels, Enter sends and Shift + Enter adds a new line. ⌘ + Enter / Ctrl + Enter still sends everywhere. The Send and resolve shortcut is set separately in the same category; see Send and resolve.Troubleshooting
Related Documentation
Inbox
Send and resolve, views and sessions
Filters and sorting
The filters menu behind M
Comments and mentions
Notifications behind ⌘.
Workspace settings
Send message shortcut and more