

Settings → Availability Statuses in your OpenCX dashboard. Viewing requires the Availability statuses permission. Creating, editing, reordering and deleting statuses on this page requires write access to Settings. Agents can always see and apply their own status.
Turn on availability statuses
1
Create your statuses
Add the statuses your agents need on this page. See Create a status.
2
Switch agents to the status menu
Open Settings → Workspace → Agents → Availability statuses and turn on Enable availability statuses. Changing workspace settings requires write access to Helpdesk settings. See Workspace settings.
3
Hide built-in statuses (optional)
Turn on Hide Online or Hide Offline to remove those options from the agent menu. See Hide Online and Offline.
Create a status
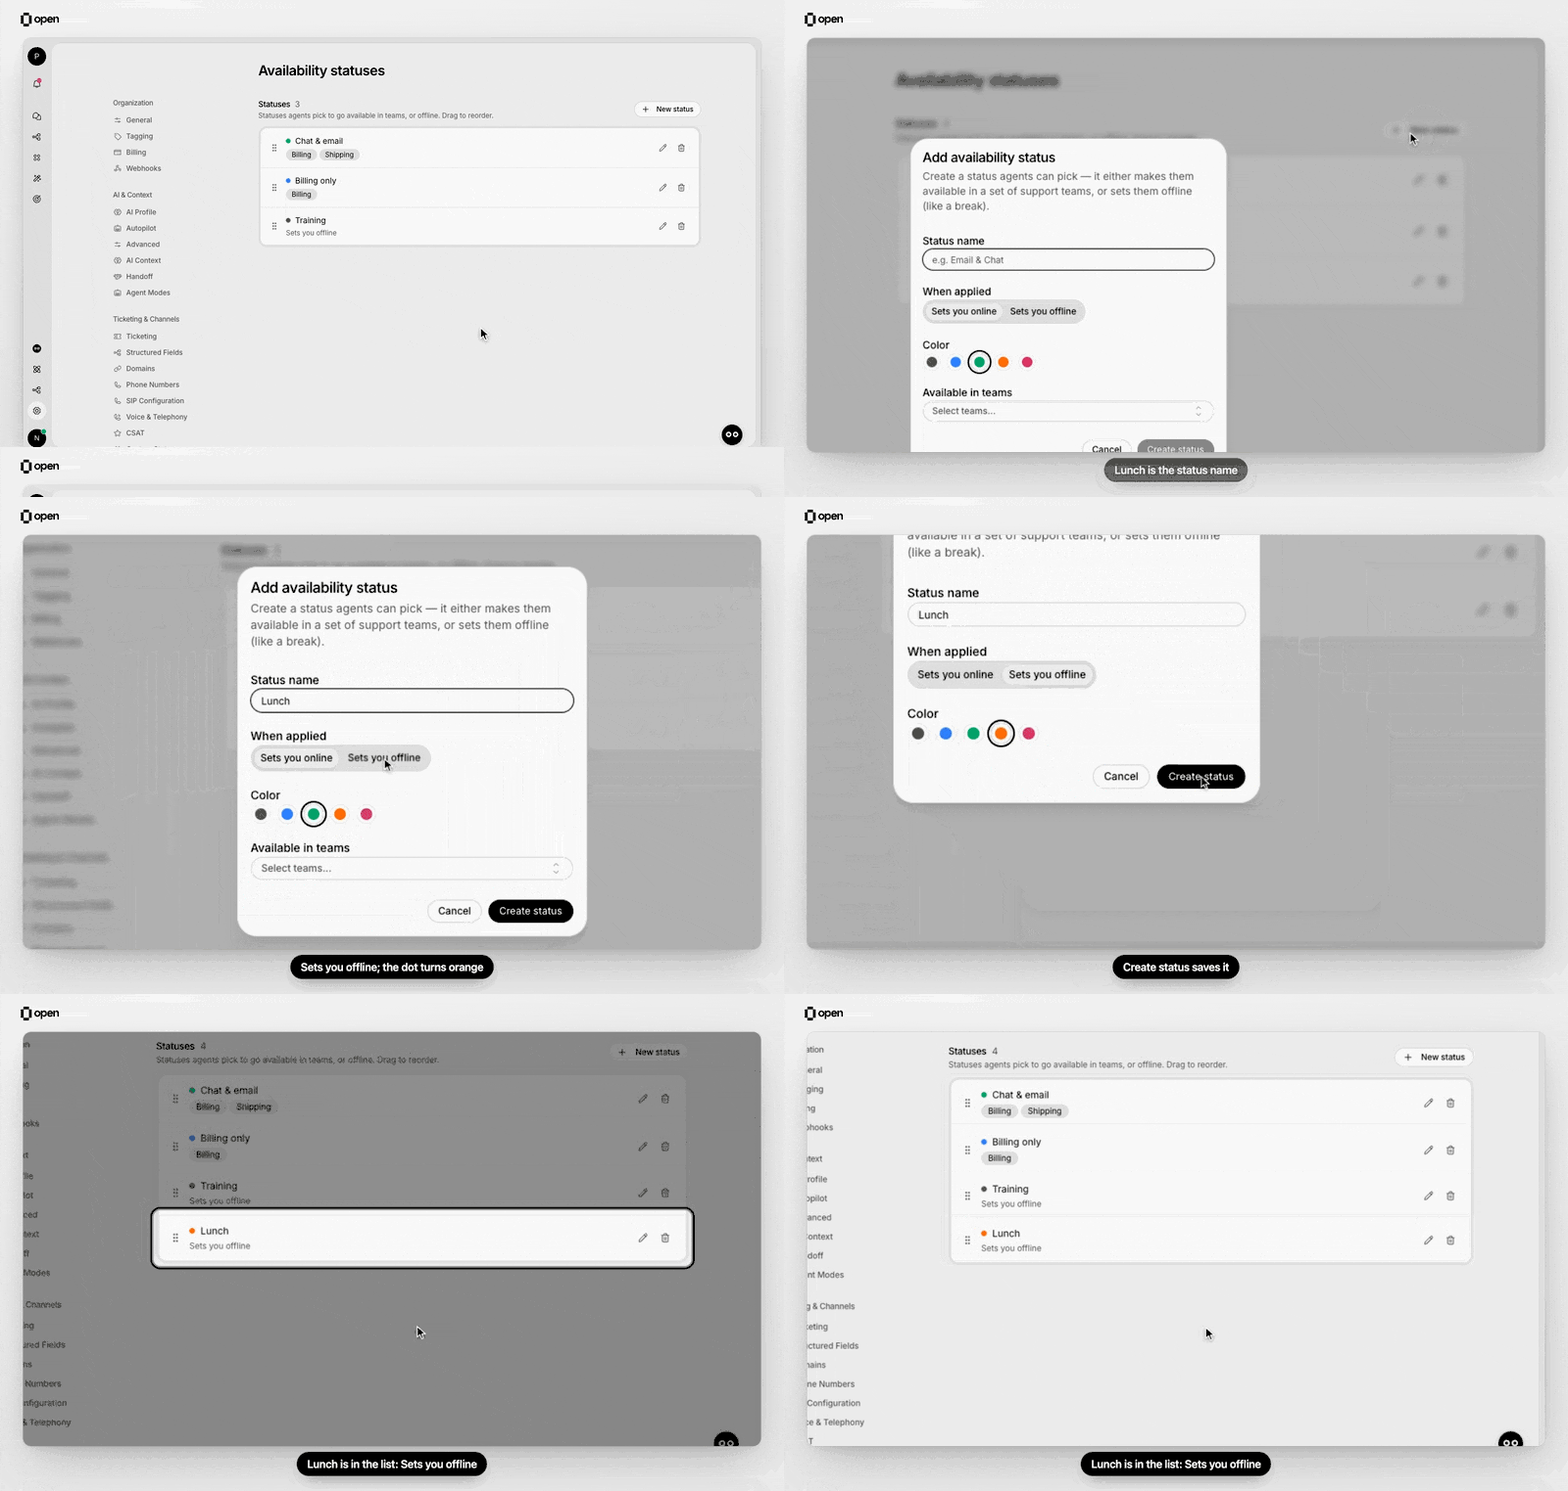
Add a Lunch status that sets agents offline, and it appears in the Statuses list.
1
Open the form
Click New status.
2
Name it
Enter a Status name, such as Email & Chat or Lunch.
3
Choose what it does
Under When applied, pick Sets you online or Sets you offline.
4
Pick a color
Choose a Color for the status dot: gray, blue, green, orange or red. It starts as green for online statuses and orange for offline ones until you pick one.
5
Pick teams
For Sets you online, choose the teams under Available in teams. Only teams with support enabled are listed. Click Create status.
A status never adds an agent to a team: listed teams the agent is not a member of are skipped. Teams without support enabled are never changed.
Order, edit and delete statuses
Drag a status by its handle to reorder. Agents see the same order in their menu, between Online at the top and Offline at the bottom.- Editing the name, color or teams does not change agents who already have the status. The new teams apply the next time an agent picks it.
- Changing When applied removes the status from agents who have it. Their availability stays as it was and shows as Online, Offline or Mixed availability.
- Deleting a status removes it and clears it from every agent using it, without changing their availability. This cannot be undone.
How agents set their status
Agents open the menu under their name at the bottom of the sidebar. The same controls appear in the Phone Desk.- Statuses on
- Statuses off
The status row shows the agent’s current status. Hover it to pick Online, a custom status, or Offline. Mixed availability appears when the agent is online but available in only some support teams, for example “Available in Billing and Sales”. It shows the current state and cannot be picked.
Hide Online and Offline
Both switches sit under Settings → Workspace → Agents → Availability statuses and only appear while Enable availability statuses is on.- Hide Online removes the built-in Online option from the agent menu. Agents who are online still show as Online.
- Hide Offline removes the built-in Offline option. Agents who are offline still show as Offline.
Effect on assignment and time tracking
- Assignment: automatic team assignment follows the switches a status sets. An agent receives sessions only in teams where they are available and their main availability is on. See Human routing.
- Coming online: picking a status that turns teams on checks those teams’ waiting sessions right away.
- Existing sessions: going offline does not take away sessions the agent already has. With session snoozing on, a snoozed session that wakes while its agent is offline returns to the queue unless Keep assigned agent when recently offline is on.
- Workflows: Agent Availability Changed runs when an agent’s main availability flips, and Agent Availability in Team Changed runs for each team a status turns on or off.
- Time tracking: every status change is recorded with the status name. Time in a status counts as available time, not worked time. See Agent time tracking.
Troubleshooting
Related Documentation
Human routing
Availability and capacity per agent
Teams
Support teams and member availability
Agent time tracking
Available time next to worked time
Workspace settings
Turn statuses on and hide built-ins