

Contacts in your OpenCX dashboard. The page has no sidebar entry: press ⌘K (Ctrl+K on Windows) and choose Contacts. See keyboard shortcuts. Importing requires the Contacts permission with Write; exporting the list requires Read.
Prepare your file
Empty rows are skipped, and spaces around values are trimmed.
Import contacts
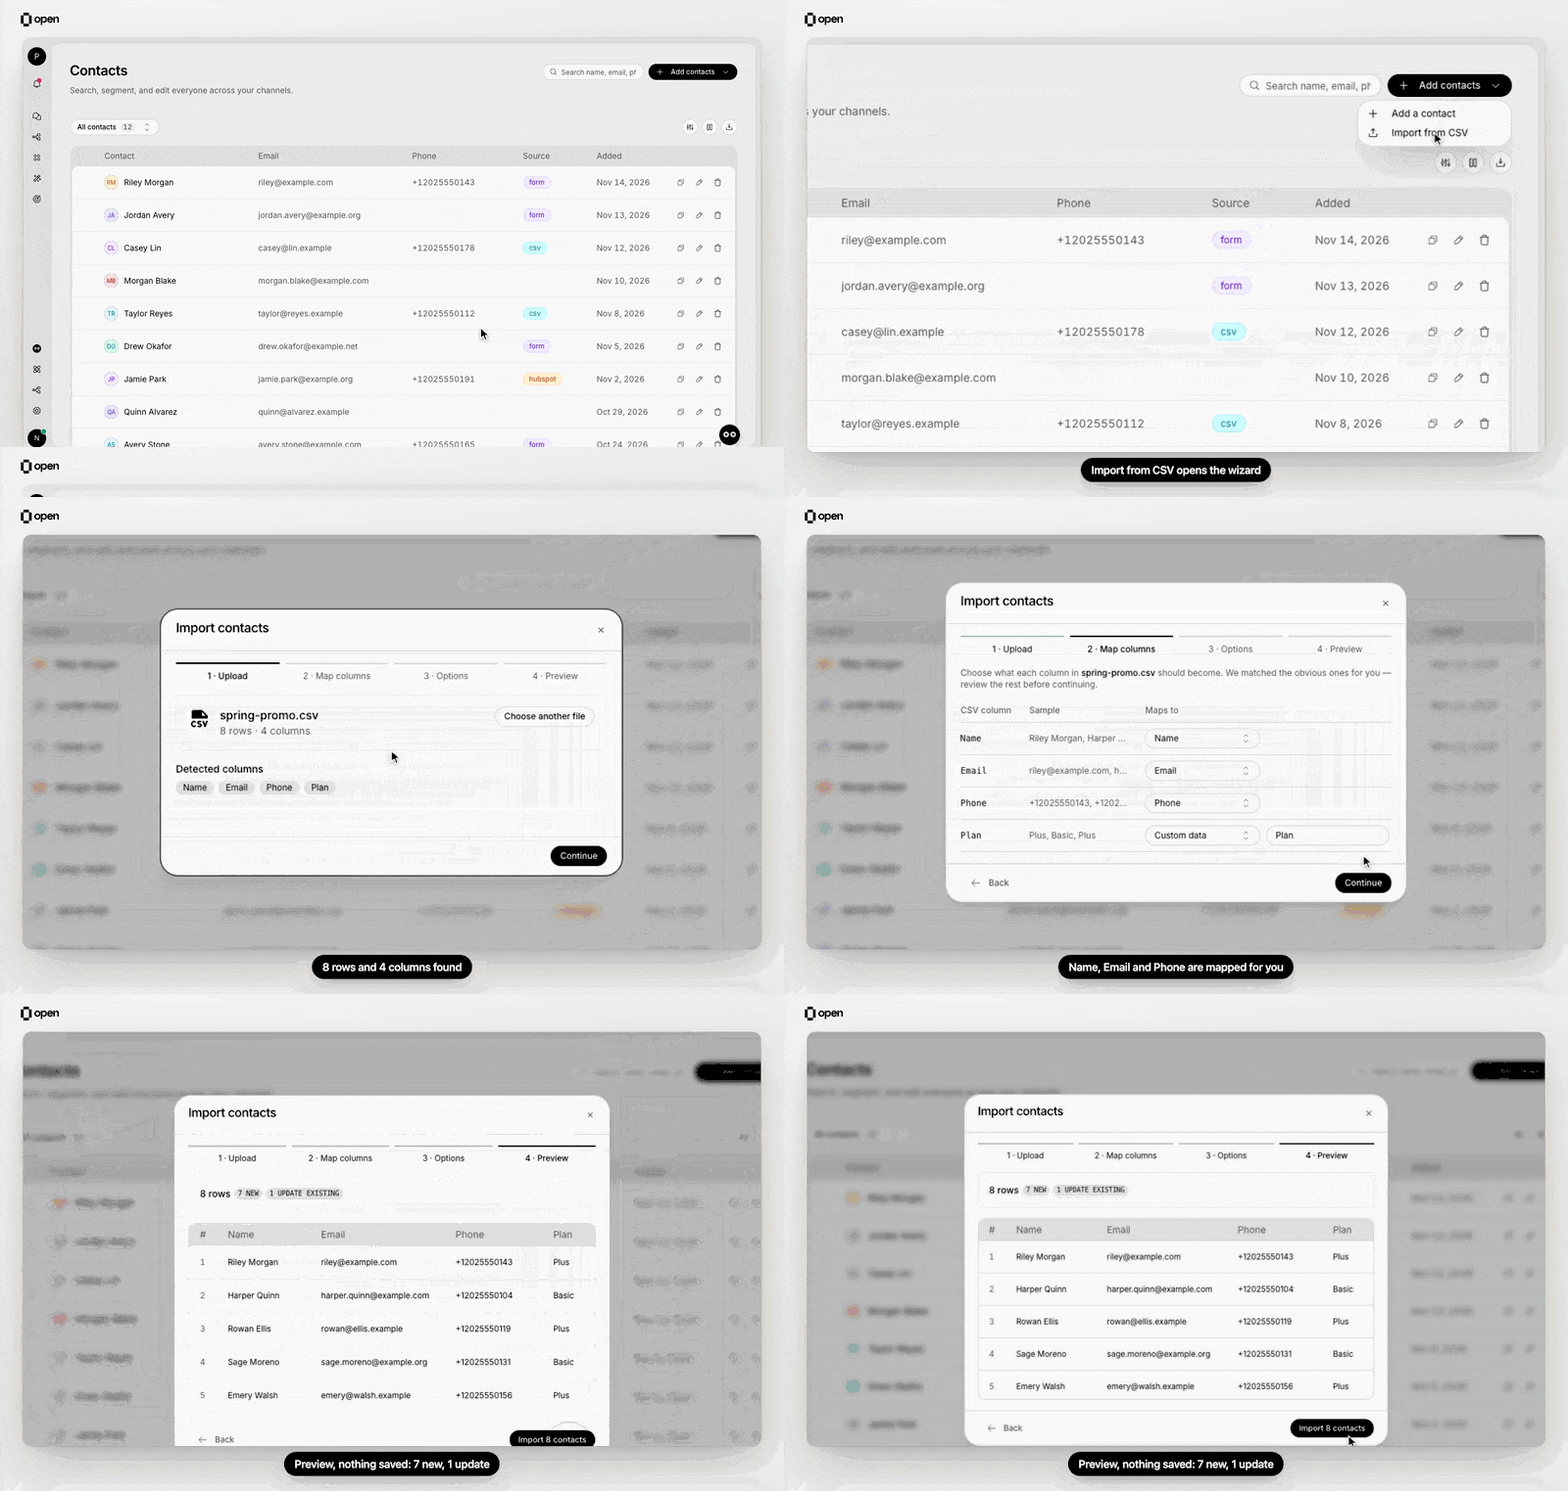
Upload, Map columns, Options and Preview: the preview counts new and updated contacts before anything is saved.
1
Open the import
On the Contacts page, select Add contacts → Import from CSV. On an empty contact list, Import contacts opens the same dialog.
2
Upload
Drop the file on the upload area or click to browse. The dialog shows the row count, the column count and the detected columns. Select Choose another file to start over.
3
Map columns
For each column, pick what it becomes: Name, Email, Phone, Language, Custom data (with a field key you can edit) or Don’t import. Common headers such as Name, Email, Phone, Mobile, WhatsApp and Language are matched for you, and every other column starts as custom data named after its header. Map at least one column, and use each field and each custom data key only once.
4
Choose options
Set Match existing contacts by, When a match is found and Only fill blank fields (see How rows are matched). Below them, you can tag every imported contact with the same custom data. An
import_batch field is filled in for you with the date and file name, such as 2026-07-30-contacts. Use Add field for more.5
Preview
OpenCX checks the whole file without saving anything and shows how many rows are new, will update existing contacts, are duplicates within the file, or are invalid. Invalid rows and cells are highlighted in the first 50 rows. Select Import N contacts to start.
6
Follow the import
A progress bar shows rows processed. You can close the dialog: the import keeps running, a spinner shows on Add contacts, and a notification reports the totals when it finishes. Cancel import stops it; contacts already imported stay.
7
Review the result
The result lists contacts created, updated, skipped and failed, plus duplicates in the file and rows that matched more than one contact. Row errors are grouped by reason; up to 1,000 are listed, and the counts include every row. Download error rows saves those rows with their original columns plus an
error column. Fix them, set the error column to Don’t import, and import that file.import_batch equals the batch value. Imported contacts show csv as their source.
How rows are matched
Match existing contacts by is an ordered list. For each row, the first property in the list that the row has a value for decides which existing contact it is. Use Add fallback to add properties, shown as then, if blank. The default is Phone number. For example, match by a custom fieldcustomer_id, then Email: rows with a customer ID match on it, and rows without one match on their email. At least one property in the list must be mapped to a column. Don’t match (always create) turns matching off, and every row creates a new contact.
When a row matches an existing contact:
A few rules apply to every import:
- Blank cells never erase data. An empty cell leaves the existing value alone.
- Tags from the Options step are always written, even with Only fill blank fields on, so every contact in the import carries the batch value. A row’s own value for the same key wins over the tag.
- Repeated rows are skipped. A row with the same identity as an earlier row is listed as “Duplicate of row N”.
- Several matches use the newest. If a row matches more than one contact, the most recently updated contact is used.
- An email can’t be taken from another contact. A row that would give a contact an email another contact already has fails with “Email already belongs to another contact”.
- Matching needs distinct values. If the property you match on is shared by more than 20,000 existing contacts, the preview stops and asks you to match on a property with distinct values per contact.
Import history and sequences
Import history and sequences
In a sequence’s Audience tab, when no contacts are targeted yet, the Add contacts menu offers Bulk Import, Connect with CRM, Import via API and Import history. An import started there points the sequence’s audience at that import’s batch when it completes.Import history lists your 20 most recent imports with their status, created and failed counts. Open a completed import to see its result and select Target these contacts to point the audience at that batch. Error rows downloaded from history list only the row number, column and message, not the original row data.
Other ways to add contacts in bulk
Other ways to add contacts in bulk
The upload step links to Settings → CRMs to sync contacts from a connected CRM, and to the create contact API for imports from your own systems.
Export contacts
1
Open the export
On the Contacts page, select the export button in the list toolbar (Export contacts).
2
Choose what to export
Current view exports what the list shows: the selected view, search and filters, in the list’s order. All contacts exports everyone and ignores filters. Each option shows its contact count.
3
Choose columns
Contact ID, Name, Email, Phone, Source and Created at are checked by default. Under Custom properties, every custom data key used on your contacts is listed and checked; uncheck the ones you don’t need.
4
Download
Select Export CSV. The file is built in your browser and downloads as
contacts_export_<date>.csv. Keep the dialog open until the download starts.Troubleshooting
Related Documentation
Manage contacts
Find, filter and edit contacts.
Segments
Group contacts with saved conditions.
Create a contact (API)
Add contacts from your own systems.
Sequences API
Reach imported contacts with outbound sequences.