> ## Documentation Index
> Fetch the complete documentation index at: https://docs.open.cx/llms.txt
> Use this file to discover all available pages before exploring further.
# Inbox
> Manage customer sessions across channels in Inbox. Answer AI help requests, reply without taking over, and find past sessions by tag.
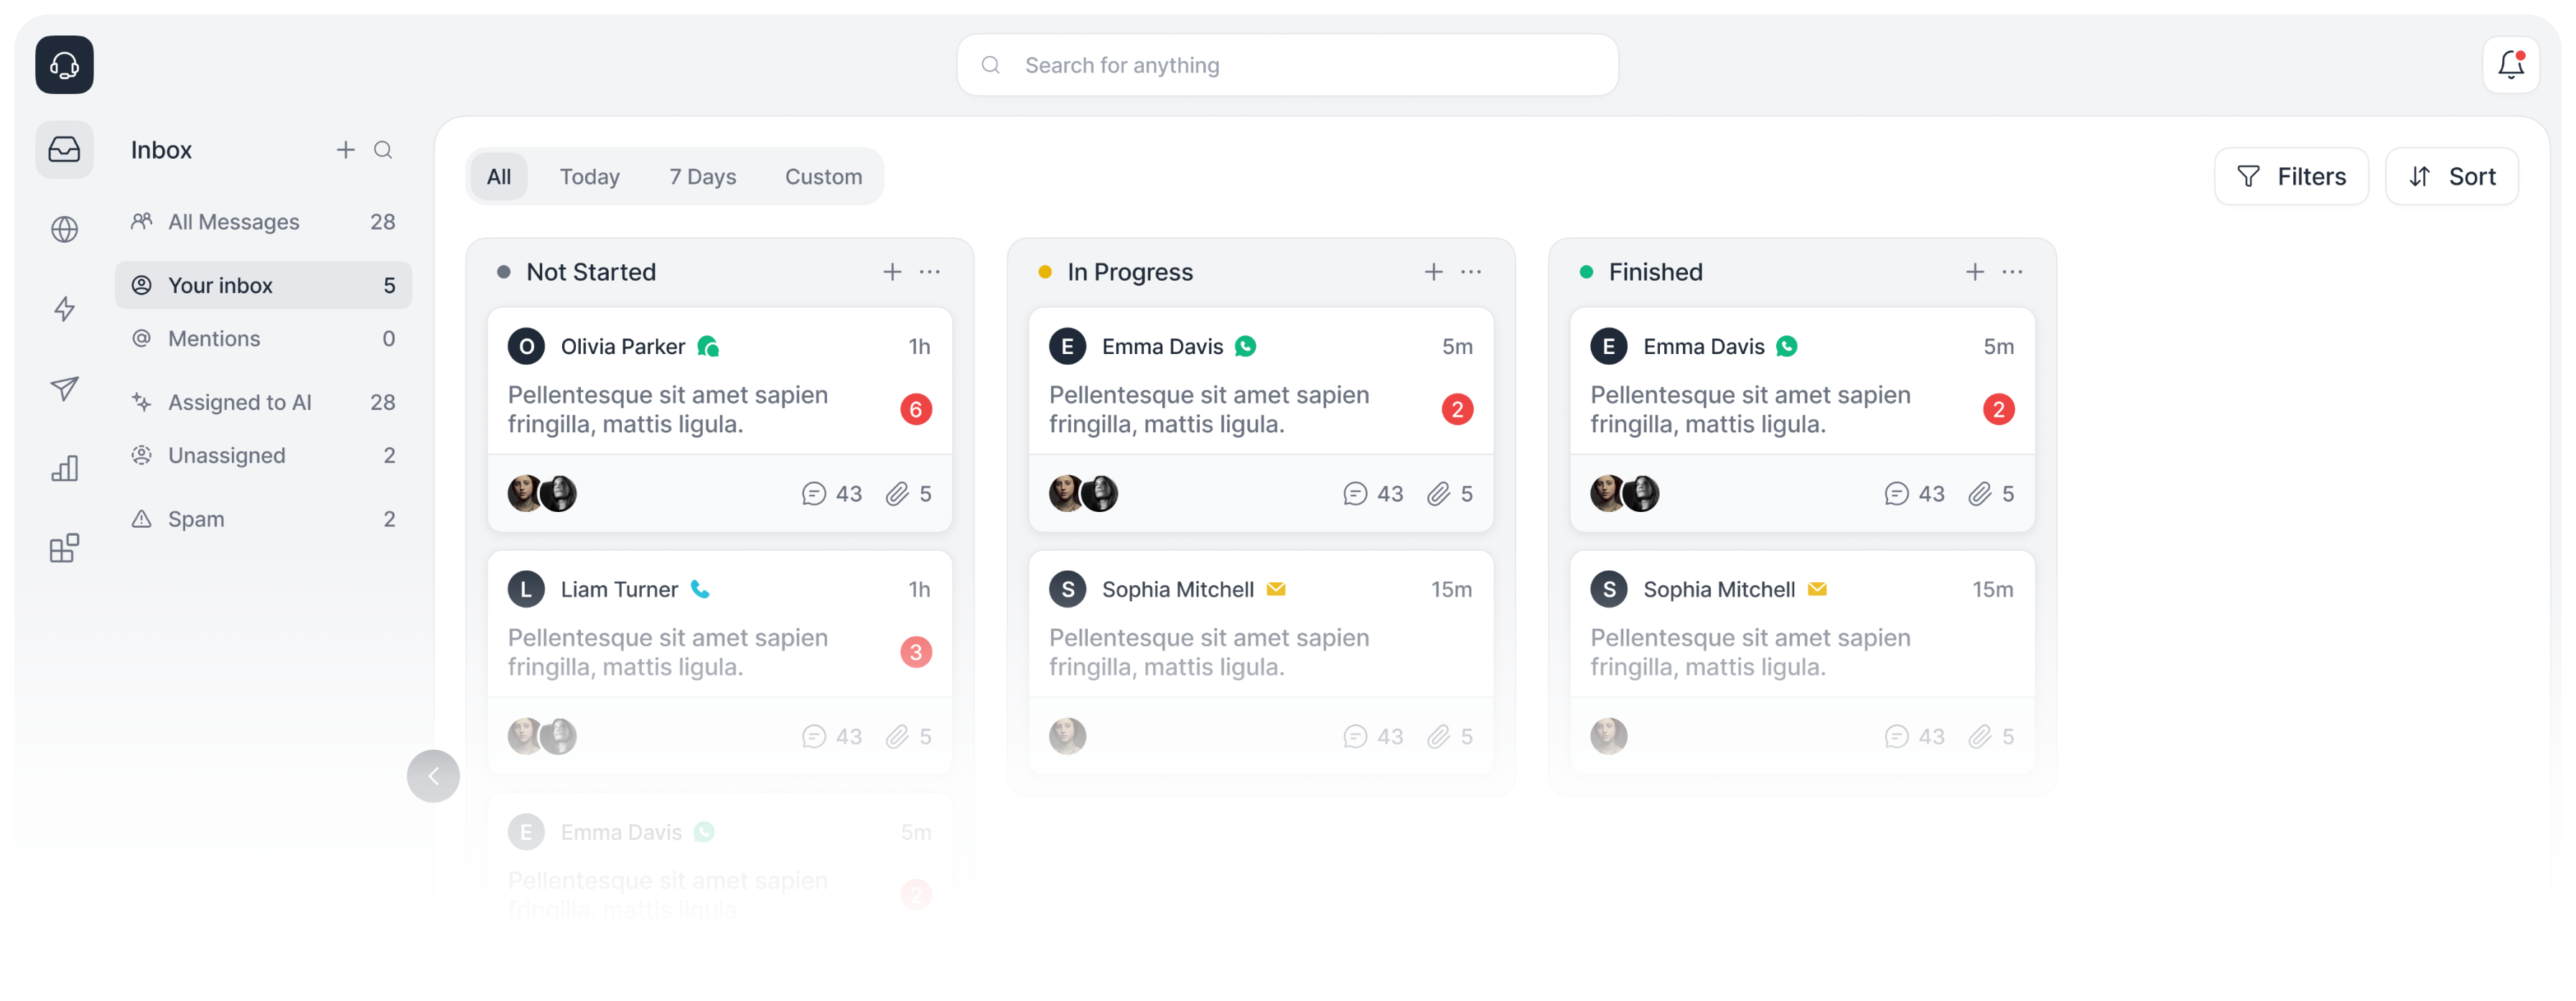 **(*Everything is in a single place, no matter what channel you are using—email, chat, phone,
etc.*)**
The Inbox is a centralized place to view, manage, and take action on your customer support conversations across all your channels (email, chat, phone, etc.).
* You will be able to see all your customer support conversations in one place.
* You can take action on your conversations from the Inbox (reply, change status, add notes, share, etc.).
**Types of Inboxes:**
* **Assigned to Me** - Any conversation you have with a customer assigned to you.
* **Assigned to Copilot** - Any conversation that is being handled by the AI.
* **Unassigned** - Any conversation that is not assigned to you or the AI.
* **Everything** - All conversations.
Hover over the last-message preview on a session card to read its full text in a
tooltip without opening the session, just as you can with the session title.
For long messages, move your pointer into the tooltip and scroll to read the rest.
## See who is viewing a session
Small teammate avatars on the right of an Inbox session card mean someone else
is viewing that session. They appear to the left of the summary icon when one is
shown. Up to three avatars overlap in a stack; **+N** counts any additional
viewers. Hover over the indicator to see everyone's names; scroll inside the
tooltip when the list is long.
Your own avatar is excluded, and multiple tabs belonging to one teammate count once.
Viewing is separate from assignment and does not prevent you from opening or
replying to the session. Indicators refresh about every 10 seconds while your
Inbox tab is visible. After a browser closes unexpectedly, an indicator can take
about 40 seconds to disappear. An absent indicator is not a guarantee that nobody
else is working on the session.
## Answer an AI help request
With [Team in the loop](/handoff/settings#team-in-the-loop) enabled, the AI can mention you in an internal Inbox note when it needs help. The customer sees the AI's progress message, while the note and your thread reply stay private.
1. Open the session from the mention notification or find it with the **AI needs help** tag.
2. Open the help note's thread and reply with the answer or confirmation the AI needs.
3. The AI follows up with the customer in the same session. If another question joined the note thread, answer the latest request there.
You can also reply directly to the customer. That answers the open help request, and the AI resumes when the customer next writes.
### Reply without taking over
When Team in the loop applies to an AI-assigned session, typing and sending replies keep AI assigned, even if it has not asked for help. Before your first direct reply, a dialog offers:
* **Send reply** — send your message and keep AI available.
* **Take over and send** — assign the session to yourself, then send.
* **×** — close the dialog and keep the draft unsent.
The choice is acknowledged once per member and workspace in that browser. Later replies send without the dialog. To take over at any time, open the **AI** assignee menu in the session header and choose **Take over**.
### Review past requests
Filter by the **AI needs help** tag and include closed sessions to review past requests. Save those filters as a view to return to them later. The tag remains after an answer or takeover, so tagged sessions are a history of requests, not a list of unanswered ones.
## Send and resolve
To reply and resolve an open session in one action, write your reply, open the arrow
beside **Send**, and select **Send and resolve**. You can also press **⌘⇧Enter** on
Mac or **Ctrl⇧Enter** on Windows and Linux. The main **Send** button and your existing
send shortcut continue to send without resolving.
If your workspace requires Structured Fields before closing, complete the form first.
The form follows the session team's requirements and includes values already recorded.
Choose **Send and resolve** to continue, or **Cancel** to keep your draft unsent.
The session resolves after the reply succeeds. If the reply fails, the session stays
open and your draft remains. If the reply succeeds but resolution fails, use
**Resolve session** in the same menu to retry without sending the reply again.
After successful resolution, your preference to open the next assigned session still applies.
This action requires permission to update sessions. It is available for replies to
open sessions; internal notes and WhatsApp template sending keep their existing behavior.
### Send and set a custom status
Workspace admins can add custom statuses to the same menu under **Settings → Workspace →
Send and set status**. Each enabled status appears as **Send and \[status]**, in the order
it was added. Choosing one sends your reply and then applies that status. A status that
closes the session follows the same rules as **Send and resolve**: the Structured Fields
form, the retry option (**Set \[status]**) if only the status change fails, and your
open-next-session preference. A status that keeps the session open skips those steps.
Statuses limited to certain teams only appear for agents in those teams.
## Change an email session's primary contact
In a native OpenCX email session, select the recipient beside **To** above the reply
composer. Search for an existing contact by name or email, or enter a new email
address and select **Use**. Contact search requires permission to read contacts;
you can still enter an email address without it. Review **Cc**, then select **Send**.
Sending transfers the existing session to that person as its primary contact.
Editing the draft or opening Preview does not transfer the session.
If the new contact has no name yet, their email address identifies them in the
inbox. When they reply with a sender name, that name appears on their contact.
* The new primary contact receives your reply and earlier customer-visible history.
Earlier file attachments are available as download links beside their original
messages in that history. Internal notes and unsent AI suggestions are excluded.
* Existing Cc recipients remain editable. The previous primary contact is not
automatically added to Cc and receives no new email unless included.
* The timeline records who changed the primary contact, the previous and new
contacts, and when the change happened. Earlier messages keep their original authors.
* Replies from either the new contact or an earlier participant can join the same
session. An earlier participant's reply does not change the primary contact back.
* Existing AI and human-assignment rules continue. Changing To is a human action;
it does not introduce an additional automation mode.
If delivery fails after the transfer is saved, the new primary contact remains.
The email shows its delivery status; use **Retry email** to retry that message.
If sending is interrupted, OpenCX resumes the saved attempt once the previous send
is no longer active. Emails already accepted for delivery finish their session
updates without being sent again. Older unconfirmed sends require delivery review.
Reopening a saved email draft keeps its files and quoted-message reference, so
retrying an unchanged draft continues the original send. File removals and changes
to the quoted message are saved separately, so reopening an edited draft keeps those edits.
Automatic recovery keeps the current assignment if the original author has left the organization.
Retrying preserves its original author and recipients without replacing an existing
human assignee or reopening the session. If the requested takeover from AI did not
complete, retrying finishes it as the teammate who selects **Retry email**. The
session is marked read for that teammate. Redacting email content removes saved delivery
copies and disables existing retries in that session and sessions containing
linked copies of the redacted messages.
If another agent changes the contact while you are drafting, review To and Cc
before sending. **Send and resolve** resolves the session only after sending succeeds.
Changing To shares a session's customer-visible history. For a separate exchange
with a supplier or colleague, use a linked sub-session instead. To editing supports
one recipient plus Cc and is available only for native OpenCX email inboxes, not
integration-backed sessions or campaign mailboxes. Sending requires permission to
write sessions.
## Set session priority
Priority is off by default. For native OpenCX ticketing, a workspace admin can open **Settings → Workspace → Session priority** and turn on **Enable session priority**. Changing this setting requires permission to edit workspace settings. Priority is not connected to external ticketing integrations.
Once enabled, changing a session's priority requires **Sessions** write permission.
1. Open a session and select **Set priority** beneath its title, or select its current priority badge.
2. Choose a standard or custom priority from your workspace’s list. Choose **None** to clear the priority.
3. Check the internal timeline to see who changed it. Priority also appears on session cards.
Sessions start with **None**. Priority stays set when a session closes, reopens, or moves to another team. It does not change the assignee, send a customer message, or set an SLA target, and it does not increase automatically as the customer waits.
Use the **Priority** filter to find sessions at a particular level, or select **Priority** in the sort menu. Descending order follows your workspace’s configured order, highest first and **None** last. Ascending reverses that order. Sessions at the same level are ordered by their last activity. Changing the display order does not change automatic assignment.
Turning the workspace setting off hides the priority controls, filters, sorting option, and new workflow action. Teams return to their default waiting order, and saved priority filters and sorts are ignored. Saved priorities, team assignment settings, and timeline history are kept and become available again when re-enabled.
For agents who serve multiple teams, workspace admins can enable **Prioritize across Priority-first teams** in the same Workspace settings section. It compares eligible waiting sessions across those teams while preserving each team’s assignment delay. It is off by default; see [cross-team priority assignment](/teams#prioritize-across-teams).
### Create and order custom priorities
Open **Settings → Workspace → Session priority** with permission to edit workspace settings. Enable session priority to manage the list.
1. Select **Add priority**, enter a unique name such as **VIP** or **Security**, choose a **Priority color**, and select **Save**. The color styles the whole priority pill—flag, text, border, and tinted background—on session cards and in the session header.
2. Once an active custom priority exists, the **Priority order** list appears. Drag the priority to its place, highest first. You can also focus its move handle, press Space, use the arrow keys, and press Space again.
3. Use the pencil to edit a custom priority’s name or color. Select **Reset** to return to the default appearance. The standard names stay fixed, and **None** always remains lowest.
New priorities start just above **None**. Standard and custom levels can be reordered together—for example, **Security → VIP → Urgent → High → Medium → Low → None**. The order is shared by the Inbox, workflow pickers, and teams using priority-based assignment. Changes apply to waiting sessions on subsequent assignment passes and do not move existing assignees.
To remove a custom priority, select its trash icon and choose a replacement. Existing sessions, saved filters, and workflow actions and conditions use the replacement automatically. Renaming or removing a priority does not rewrite names in historical timeline events. Standard priorities cannot be removed. Removing the last active custom priority hides the ordering list; **Add priority** remains available, and the saved order is kept.
### Set priority in a workflow
Add **Set session priority**, select the session number, and choose a standard or custom level. Use **Session priority** in a workflow condition to branch on levels such as **VIP**. Place this action before the team assignment step when priority should affect that assignment. Changing priority alone does not start a **Session Updated** workflow. While the workspace setting is off, existing priority actions are skipped and the rest of the workflow continues. Conditions can still read saved priorities. Existing actions and conditions follow the chosen replacement if a custom priority is removed.
Automatic assignment uses priority when the team selects **Priority first** or **SLA first**. See [team assignment order](/teams#choose-session-assignment-order) for how priority, SLA deadlines, and waiting time interact.
## Snooze a session
For native OpenCX ticketing, enable **Settings → Workspace → Session snoozing →
Enable session snoozing**. It starts off. Changing the setting requires workspace
settings permission; snoozing from the inbox requires permission to update sessions.
Select **Snooze** from an open session's status menu. Choose **1 hour**, **3 hours**,
**Tomorrow at 9 AM**, or a custom date and time. Times use your local timezone.
Only human-assigned or unassigned sessions can be snoozed; sessions with an active
call cannot be snoozed.
Snoozed sessions leave working views and free agent capacity. They remain
unresolved, keep their assignee and custom status, and stay accessible through
**All sessions**, search, direct links, and the **Snoozed** view. The Snoozed view
lists the earliest wake-up times first. When sorting mixed views by Snooze time,
sessions without a scheduled return appear last. Use the **Snooze** filter to include or
exclude snoozed sessions in a saved view.
A session returns when its snooze time arrives, a customer replies, an active SLA
breaches, a new call starts on the session, or an agent selects **Open** to unsnooze it. A wake-up is scheduled for the chosen deadline; it does not wait for the periodic
recovery check. Select **Snooze** again
to adjust the deadline. Agents' replies, notes, and human reassignment do not end
Snooze. Customers do not see a snoozed status.
SLAs continue under their existing rules. Inactivity follow-ups wait while the
session is snoozed and start a fresh inactivity period after it wakes, where
applicable. Workflows already running are not suspended. The session returns to
its current assignee even if they are away or at capacity; unassigned sessions
return to normal team routing.
Closing a session or assigning it to AI cancels Snooze. Disabling session snoozing
returns existing snoozed sessions to active work on the next processing cycle.
Snooze is available in the inbox and through the **Snooze Session** workflow action.
This feature does not add external integration synchronization or bulk actions.
### Snooze from a workflow
With **Enable session snoozing** on, add **Snooze Session** to a workflow. Set
**Session Number** (for example, the triggering session's number) and **Snooze
Duration** to a preset (5, 15, or 30 minutes; 1 or 3 hours; or 1 day), or choose
**Custom duration** and enter at least `1` minute. The duration starts when the step executes.
The workflow continues to its next step immediately; Snooze does not wait for the
session to wake.
The same eligibility and wake-up rules apply as inbox Snooze. The timeline records
which workflow run snoozed the session. If the workspace setting is disabled
before execution, the step fails without changing the session.
### Use Snooze in workflow conditions
In a **Session Updated** workflow, watch **Status** and compare
`{{trigger.ticket.ticketStatus}}` with `snooze` in an If/Else condition. Entering
Snooze and returning to Open fire status updates. Changing only the wake-up time
does not fire another status update. **Group by → Status** also places these
sessions in their own **Snooze** group.
## Correct session attributes
Use [session attribute dropdowns](/inbox/dropdown-attributes) to search a predefined list and correct a contact reason or another session attribute. Link an enum under **Settings → Structured Fields**, then select a value directly in the session sidebar.
## Group sessions
In **Filters → Group by**, choose **Tags**, **Contact attribute**, or **Session
attribute** alongside the existing channel, assignee, status, AI status, language,
and support team options. For an attribute, select a suggested key or type its
exact name. The list stays ungrouped until you choose a key. You need permission
to edit personal or shared views to change grouping. Save the view to keep its
grouping and attribute key.
* **Tags:** A session appears under each of its tags. Sessions with no tags appear
under **Untagged**, so a tagged session can appear more than once in the list.
* **Contact attribute:** Uses the linked contact's verified attributes.
* **Session attribute:** Uses the session's attributes, including editable
attributes when the same key is absent from its stored attributes. If a key
exists in both, the stored value takes precedence, even when empty.
Attribute groups support text, numbers, and booleans. Missing, null, and empty
values appear under **Not set**, always at the bottom. Objects and arrays appear
in a separate **Object / array** group. Hidden attributes remain hidden and cannot
be used to recover their values through grouping.
Grouping covers **loaded sessions only**. Scrolling loads more sessions into the
groups; the API still returns individual sessions. Other groups appear in the
order their first session occurs, and sessions keep their sort order within each
group. Choosing **None** restores the flat list.
### Collapse session groups
Choose a grouping in **Filters → Group by**. Each group starts expanded. Click its
header or chevron to collapse its sessions and bring the next group into view;
click again to expand it. You can also focus a group header and press **Enter** or
**Space**. This works with every grouping option.
Collapsing a group only changes the list display. It does not change the sessions
or the view's filters. Groups cover loaded sessions and update as more sessions
load. Collapsed groups stay collapsed while you browse the inbox; reloading the
page expands them again.
## Personalization
### Views sidebar
Enable **Show views in sidebar** under **Settings → Personalization → Inbox** to
keep views beside the session list. Search views by name, select a view to open its
sessions, and see counts alongside each view. Contact and session attributes remain
on the far right with their existing resize and hide controls.
Use **Create view** (+) to build a view, the row's **Actions** menu to edit or delete
it, and **Manage views** for saving filters, saving a new view, or reordering personal
views. Available actions depend on your permissions. Shared ordering and your
workspace's visibility settings still apply.
Workspace admins can enable **Show views in sidebar by default** under
**Settings → Workspace → Inbox views**. Changing this setting requires permission
to edit workspace settings. It starts off and applies to teammates without a saved
personal sidebar choice.
An existing personal on/off choice is preserved. Your personal choice follows your
account across browsers and workspaces and does not affect teammates. To follow
the active workspace's default again, select **Use workspace default** beside the
sidebar switch in Personalization. Changing another personal preference does not
stop you from following the workspace default.
Smaller windows automatically use the dropdown;
widening the window restores the sidebar unless you have hidden it. Press **V** to
search views in either layout.
Use **Hide views** beside the active view name to give the session more space. The
same button becomes **Show views** so you can bring the sidebar back. Your selected
view, open session, and unsent reply stay in place. The collapsed state is remembered
in this browser without changing your Personalization setting.
### Composer toolbar
Open **Settings → Personalization** and enable **Pin composer toolbar** under **Inbox**
to keep formatting and AI Copilot controls above the session composer. In email sessions,
the toolbar sits above Cc. It also applies when writing internal comments.
This setting is off by default: the toolbar appears when you select text. Your choice
is saved for your account across browsers and does not affect teammates. It applies to
session replies and comments, not the New Session dialog. Available formatting and
delivery behavior remain the same for each channel.
Enable **Macros button** under **Inbox** to add a macros button to the session composer
toolbar. It opens a searchable list of your macros with a preview of the
highlighted one; choosing a macro inserts it where your cursor is. While the button is on,
macros no longer appear in the **/** menu.
This setting is off by default: macros are inserted from the **/** menu. Your choice is
saved for your account across browsers and does not affect teammates. It applies to
session replies and comments, not the New Session dialog.
### Translate messages in your view
Open the session's **More options → Translation → Target language** menu to choose
which language you read. Under **Display style**, choose **Show translation beneath
original content** or **Only show translation**. These settings affect your dashboard
view; they do not rewrite stored messages or change outbound translation settings.
Translated message bodies preserve paragraphs, line breaks, emphasis, links, lists,
and nested quotations. In email sessions, quoted history stays behind **•••** in
both the message view and the email experience. Expand it to read the history;
its original text remains visible while its translation loads. A failed history
translation leaves the translated message body visible and labels the history as
original. If only the history is translated, only that section is labeled as a
translation. If translation is unavailable, the original content remains readable.
In the email experience, **Only show translation** displays one translated email
once it is ready, retaining its inline images, layout, and quoted-history control.
**Show translation beneath original content** displays both versions. Attachments
remain available below the email; inline images are not repeated as attachments.
The original stays visible while translation is loading or unavailable. Text inside
image files is not translated.
### Macro options
A macro can carry up to 3 options the customer taps instead of typing, such as **Yes** and
**No** on a consent question. Add them in **Settings → Macros** when you create or edit an
org-wide macro, or set them through the API (`options` on `POST /macros` and
`PATCH /macros/{id}`) or the Companion. Each label is up to 20
characters. Personal macros can't have options; a personal version of an org-wide macro sends
the org-wide macro's options.
Each option does one of two things when tapped:
* **Send as reply** — the label reaches the session as the customer's message and is
handled like anything they type.
* **Trigger workflow** — the tap runs your **Macro Option Clicked** workflows for that macro
and the AI doesn't reply. Branch on **Option ID** or **Option Label** in the workflow.
This works whoever owns the session. If no active workflow listens for the macro, the tap
is handled like a message the customer typed.
Only the first tap on the newest message with options counts. A second tap, a tap on an
older message's options, or a tap on a closed session arrives as a normal message and runs
nothing. The message in the
session timeline shows the options that were sent and marks the one the customer picked.
The **/** menu, the macro picker and the composer show a macro's options before you send it;
remove them from the composer to send the message without options.
Options are sent as buttons on the web widget, WhatsApp, Messenger and Instagram, and delivered
to your own client on API sessions (see [Send a message](/api-reference/chat-sessions/send#option-taps)).
A website running an older widget version shows the message without the buttons; the customer
can still type their answer. On other channels, including sessions linked to HubSpot or
Intercom conversations, only the message is sent, and the inbox tells you so when you insert
the macro.
The first message of a new session is always sent without options. On WhatsApp, a message with
options is limited to 1,024 characters.
### FAQ
Periodic refreshes of the session list and selected session details pause while the browser
tab is hidden. They refresh when you return to the tab. Live session updates can still arrive
while the tab is in the background.
Check the assignee in the session header and your current Inbox filters. When
Team in the loop applies, replying keeps the session assigned to AI. If you
took over, find it among sessions assigned to you. For other sessions, the
existing assignment behavior still applies.
If you reply to a phone conversation using text, Open will send this text message to the customer's phone number.
## Available APIs
Open provides top-of-the-line APIs for developers to build on top of our platform, including inbox APIs.
List and manage support requests and conversations from web, phone, and email channels in a
single place.
This documentation is built and hosted on [Mintlify](https://mintlify.com), a developer documentation platform.
**(*Everything is in a single place, no matter what channel you are using—email, chat, phone,
etc.*)**
The Inbox is a centralized place to view, manage, and take action on your customer support conversations across all your channels (email, chat, phone, etc.).
* You will be able to see all your customer support conversations in one place.
* You can take action on your conversations from the Inbox (reply, change status, add notes, share, etc.).
**Types of Inboxes:**
* **Assigned to Me** - Any conversation you have with a customer assigned to you.
* **Assigned to Copilot** - Any conversation that is being handled by the AI.
* **Unassigned** - Any conversation that is not assigned to you or the AI.
* **Everything** - All conversations.
Hover over the last-message preview on a session card to read its full text in a
tooltip without opening the session, just as you can with the session title.
For long messages, move your pointer into the tooltip and scroll to read the rest.
## See who is viewing a session
Small teammate avatars on the right of an Inbox session card mean someone else
is viewing that session. They appear to the left of the summary icon when one is
shown. Up to three avatars overlap in a stack; **+N** counts any additional
viewers. Hover over the indicator to see everyone's names; scroll inside the
tooltip when the list is long.
Your own avatar is excluded, and multiple tabs belonging to one teammate count once.
Viewing is separate from assignment and does not prevent you from opening or
replying to the session. Indicators refresh about every 10 seconds while your
Inbox tab is visible. After a browser closes unexpectedly, an indicator can take
about 40 seconds to disappear. An absent indicator is not a guarantee that nobody
else is working on the session.
## Answer an AI help request
With [Team in the loop](/handoff/settings#team-in-the-loop) enabled, the AI can mention you in an internal Inbox note when it needs help. The customer sees the AI's progress message, while the note and your thread reply stay private.
1. Open the session from the mention notification or find it with the **AI needs help** tag.
2. Open the help note's thread and reply with the answer or confirmation the AI needs.
3. The AI follows up with the customer in the same session. If another question joined the note thread, answer the latest request there.
You can also reply directly to the customer. That answers the open help request, and the AI resumes when the customer next writes.
### Reply without taking over
When Team in the loop applies to an AI-assigned session, typing and sending replies keep AI assigned, even if it has not asked for help. Before your first direct reply, a dialog offers:
* **Send reply** — send your message and keep AI available.
* **Take over and send** — assign the session to yourself, then send.
* **×** — close the dialog and keep the draft unsent.
The choice is acknowledged once per member and workspace in that browser. Later replies send without the dialog. To take over at any time, open the **AI** assignee menu in the session header and choose **Take over**.
### Review past requests
Filter by the **AI needs help** tag and include closed sessions to review past requests. Save those filters as a view to return to them later. The tag remains after an answer or takeover, so tagged sessions are a history of requests, not a list of unanswered ones.
## Send and resolve
To reply and resolve an open session in one action, write your reply, open the arrow
beside **Send**, and select **Send and resolve**. You can also press **⌘⇧Enter** on
Mac or **Ctrl⇧Enter** on Windows and Linux. The main **Send** button and your existing
send shortcut continue to send without resolving.
If your workspace requires Structured Fields before closing, complete the form first.
The form follows the session team's requirements and includes values already recorded.
Choose **Send and resolve** to continue, or **Cancel** to keep your draft unsent.
The session resolves after the reply succeeds. If the reply fails, the session stays
open and your draft remains. If the reply succeeds but resolution fails, use
**Resolve session** in the same menu to retry without sending the reply again.
After successful resolution, your preference to open the next assigned session still applies.
This action requires permission to update sessions. It is available for replies to
open sessions; internal notes and WhatsApp template sending keep their existing behavior.
### Send and set a custom status
Workspace admins can add custom statuses to the same menu under **Settings → Workspace →
Send and set status**. Each enabled status appears as **Send and \[status]**, in the order
it was added. Choosing one sends your reply and then applies that status. A status that
closes the session follows the same rules as **Send and resolve**: the Structured Fields
form, the retry option (**Set \[status]**) if only the status change fails, and your
open-next-session preference. A status that keeps the session open skips those steps.
Statuses limited to certain teams only appear for agents in those teams.
## Change an email session's primary contact
In a native OpenCX email session, select the recipient beside **To** above the reply
composer. Search for an existing contact by name or email, or enter a new email
address and select **Use**. Contact search requires permission to read contacts;
you can still enter an email address without it. Review **Cc**, then select **Send**.
Sending transfers the existing session to that person as its primary contact.
Editing the draft or opening Preview does not transfer the session.
If the new contact has no name yet, their email address identifies them in the
inbox. When they reply with a sender name, that name appears on their contact.
* The new primary contact receives your reply and earlier customer-visible history.
Earlier file attachments are available as download links beside their original
messages in that history. Internal notes and unsent AI suggestions are excluded.
* Existing Cc recipients remain editable. The previous primary contact is not
automatically added to Cc and receives no new email unless included.
* The timeline records who changed the primary contact, the previous and new
contacts, and when the change happened. Earlier messages keep their original authors.
* Replies from either the new contact or an earlier participant can join the same
session. An earlier participant's reply does not change the primary contact back.
* Existing AI and human-assignment rules continue. Changing To is a human action;
it does not introduce an additional automation mode.
If delivery fails after the transfer is saved, the new primary contact remains.
The email shows its delivery status; use **Retry email** to retry that message.
If sending is interrupted, OpenCX resumes the saved attempt once the previous send
is no longer active. Emails already accepted for delivery finish their session
updates without being sent again. Older unconfirmed sends require delivery review.
Reopening a saved email draft keeps its files and quoted-message reference, so
retrying an unchanged draft continues the original send. File removals and changes
to the quoted message are saved separately, so reopening an edited draft keeps those edits.
Automatic recovery keeps the current assignment if the original author has left the organization.
Retrying preserves its original author and recipients without replacing an existing
human assignee or reopening the session. If the requested takeover from AI did not
complete, retrying finishes it as the teammate who selects **Retry email**. The
session is marked read for that teammate. Redacting email content removes saved delivery
copies and disables existing retries in that session and sessions containing
linked copies of the redacted messages.
If another agent changes the contact while you are drafting, review To and Cc
before sending. **Send and resolve** resolves the session only after sending succeeds.
Changing To shares a session's customer-visible history. For a separate exchange
with a supplier or colleague, use a linked sub-session instead. To editing supports
one recipient plus Cc and is available only for native OpenCX email inboxes, not
integration-backed sessions or campaign mailboxes. Sending requires permission to
write sessions.
## Set session priority
Priority is off by default. For native OpenCX ticketing, a workspace admin can open **Settings → Workspace → Session priority** and turn on **Enable session priority**. Changing this setting requires permission to edit workspace settings. Priority is not connected to external ticketing integrations.
Once enabled, changing a session's priority requires **Sessions** write permission.
1. Open a session and select **Set priority** beneath its title, or select its current priority badge.
2. Choose a standard or custom priority from your workspace’s list. Choose **None** to clear the priority.
3. Check the internal timeline to see who changed it. Priority also appears on session cards.
Sessions start with **None**. Priority stays set when a session closes, reopens, or moves to another team. It does not change the assignee, send a customer message, or set an SLA target, and it does not increase automatically as the customer waits.
Use the **Priority** filter to find sessions at a particular level, or select **Priority** in the sort menu. Descending order follows your workspace’s configured order, highest first and **None** last. Ascending reverses that order. Sessions at the same level are ordered by their last activity. Changing the display order does not change automatic assignment.
Turning the workspace setting off hides the priority controls, filters, sorting option, and new workflow action. Teams return to their default waiting order, and saved priority filters and sorts are ignored. Saved priorities, team assignment settings, and timeline history are kept and become available again when re-enabled.
For agents who serve multiple teams, workspace admins can enable **Prioritize across Priority-first teams** in the same Workspace settings section. It compares eligible waiting sessions across those teams while preserving each team’s assignment delay. It is off by default; see [cross-team priority assignment](/teams#prioritize-across-teams).
### Create and order custom priorities
Open **Settings → Workspace → Session priority** with permission to edit workspace settings. Enable session priority to manage the list.
1. Select **Add priority**, enter a unique name such as **VIP** or **Security**, choose a **Priority color**, and select **Save**. The color styles the whole priority pill—flag, text, border, and tinted background—on session cards and in the session header.
2. Once an active custom priority exists, the **Priority order** list appears. Drag the priority to its place, highest first. You can also focus its move handle, press Space, use the arrow keys, and press Space again.
3. Use the pencil to edit a custom priority’s name or color. Select **Reset** to return to the default appearance. The standard names stay fixed, and **None** always remains lowest.
New priorities start just above **None**. Standard and custom levels can be reordered together—for example, **Security → VIP → Urgent → High → Medium → Low → None**. The order is shared by the Inbox, workflow pickers, and teams using priority-based assignment. Changes apply to waiting sessions on subsequent assignment passes and do not move existing assignees.
To remove a custom priority, select its trash icon and choose a replacement. Existing sessions, saved filters, and workflow actions and conditions use the replacement automatically. Renaming or removing a priority does not rewrite names in historical timeline events. Standard priorities cannot be removed. Removing the last active custom priority hides the ordering list; **Add priority** remains available, and the saved order is kept.
### Set priority in a workflow
Add **Set session priority**, select the session number, and choose a standard or custom level. Use **Session priority** in a workflow condition to branch on levels such as **VIP**. Place this action before the team assignment step when priority should affect that assignment. Changing priority alone does not start a **Session Updated** workflow. While the workspace setting is off, existing priority actions are skipped and the rest of the workflow continues. Conditions can still read saved priorities. Existing actions and conditions follow the chosen replacement if a custom priority is removed.
Automatic assignment uses priority when the team selects **Priority first** or **SLA first**. See [team assignment order](/teams#choose-session-assignment-order) for how priority, SLA deadlines, and waiting time interact.
## Snooze a session
For native OpenCX ticketing, enable **Settings → Workspace → Session snoozing →
Enable session snoozing**. It starts off. Changing the setting requires workspace
settings permission; snoozing from the inbox requires permission to update sessions.
Select **Snooze** from an open session's status menu. Choose **1 hour**, **3 hours**,
**Tomorrow at 9 AM**, or a custom date and time. Times use your local timezone.
Only human-assigned or unassigned sessions can be snoozed; sessions with an active
call cannot be snoozed.
Snoozed sessions leave working views and free agent capacity. They remain
unresolved, keep their assignee and custom status, and stay accessible through
**All sessions**, search, direct links, and the **Snoozed** view. The Snoozed view
lists the earliest wake-up times first. When sorting mixed views by Snooze time,
sessions without a scheduled return appear last. Use the **Snooze** filter to include or
exclude snoozed sessions in a saved view.
A session returns when its snooze time arrives, a customer replies, an active SLA
breaches, a new call starts on the session, or an agent selects **Open** to unsnooze it. A wake-up is scheduled for the chosen deadline; it does not wait for the periodic
recovery check. Select **Snooze** again
to adjust the deadline. Agents' replies, notes, and human reassignment do not end
Snooze. Customers do not see a snoozed status.
SLAs continue under their existing rules. Inactivity follow-ups wait while the
session is snoozed and start a fresh inactivity period after it wakes, where
applicable. Workflows already running are not suspended. The session returns to
its current assignee even if they are away or at capacity; unassigned sessions
return to normal team routing.
Closing a session or assigning it to AI cancels Snooze. Disabling session snoozing
returns existing snoozed sessions to active work on the next processing cycle.
Snooze is available in the inbox and through the **Snooze Session** workflow action.
This feature does not add external integration synchronization or bulk actions.
### Snooze from a workflow
With **Enable session snoozing** on, add **Snooze Session** to a workflow. Set
**Session Number** (for example, the triggering session's number) and **Snooze
Duration** to a preset (5, 15, or 30 minutes; 1 or 3 hours; or 1 day), or choose
**Custom duration** and enter at least `1` minute. The duration starts when the step executes.
The workflow continues to its next step immediately; Snooze does not wait for the
session to wake.
The same eligibility and wake-up rules apply as inbox Snooze. The timeline records
which workflow run snoozed the session. If the workspace setting is disabled
before execution, the step fails without changing the session.
### Use Snooze in workflow conditions
In a **Session Updated** workflow, watch **Status** and compare
`{{trigger.ticket.ticketStatus}}` with `snooze` in an If/Else condition. Entering
Snooze and returning to Open fire status updates. Changing only the wake-up time
does not fire another status update. **Group by → Status** also places these
sessions in their own **Snooze** group.
## Correct session attributes
Use [session attribute dropdowns](/inbox/dropdown-attributes) to search a predefined list and correct a contact reason or another session attribute. Link an enum under **Settings → Structured Fields**, then select a value directly in the session sidebar.
## Group sessions
In **Filters → Group by**, choose **Tags**, **Contact attribute**, or **Session
attribute** alongside the existing channel, assignee, status, AI status, language,
and support team options. For an attribute, select a suggested key or type its
exact name. The list stays ungrouped until you choose a key. You need permission
to edit personal or shared views to change grouping. Save the view to keep its
grouping and attribute key.
* **Tags:** A session appears under each of its tags. Sessions with no tags appear
under **Untagged**, so a tagged session can appear more than once in the list.
* **Contact attribute:** Uses the linked contact's verified attributes.
* **Session attribute:** Uses the session's attributes, including editable
attributes when the same key is absent from its stored attributes. If a key
exists in both, the stored value takes precedence, even when empty.
Attribute groups support text, numbers, and booleans. Missing, null, and empty
values appear under **Not set**, always at the bottom. Objects and arrays appear
in a separate **Object / array** group. Hidden attributes remain hidden and cannot
be used to recover their values through grouping.
Grouping covers **loaded sessions only**. Scrolling loads more sessions into the
groups; the API still returns individual sessions. Other groups appear in the
order their first session occurs, and sessions keep their sort order within each
group. Choosing **None** restores the flat list.
### Collapse session groups
Choose a grouping in **Filters → Group by**. Each group starts expanded. Click its
header or chevron to collapse its sessions and bring the next group into view;
click again to expand it. You can also focus a group header and press **Enter** or
**Space**. This works with every grouping option.
Collapsing a group only changes the list display. It does not change the sessions
or the view's filters. Groups cover loaded sessions and update as more sessions
load. Collapsed groups stay collapsed while you browse the inbox; reloading the
page expands them again.
## Personalization
### Views sidebar
Enable **Show views in sidebar** under **Settings → Personalization → Inbox** to
keep views beside the session list. Search views by name, select a view to open its
sessions, and see counts alongside each view. Contact and session attributes remain
on the far right with their existing resize and hide controls.
Use **Create view** (+) to build a view, the row's **Actions** menu to edit or delete
it, and **Manage views** for saving filters, saving a new view, or reordering personal
views. Available actions depend on your permissions. Shared ordering and your
workspace's visibility settings still apply.
Workspace admins can enable **Show views in sidebar by default** under
**Settings → Workspace → Inbox views**. Changing this setting requires permission
to edit workspace settings. It starts off and applies to teammates without a saved
personal sidebar choice.
An existing personal on/off choice is preserved. Your personal choice follows your
account across browsers and workspaces and does not affect teammates. To follow
the active workspace's default again, select **Use workspace default** beside the
sidebar switch in Personalization. Changing another personal preference does not
stop you from following the workspace default.
Smaller windows automatically use the dropdown;
widening the window restores the sidebar unless you have hidden it. Press **V** to
search views in either layout.
Use **Hide views** beside the active view name to give the session more space. The
same button becomes **Show views** so you can bring the sidebar back. Your selected
view, open session, and unsent reply stay in place. The collapsed state is remembered
in this browser without changing your Personalization setting.
### Composer toolbar
Open **Settings → Personalization** and enable **Pin composer toolbar** under **Inbox**
to keep formatting and AI Copilot controls above the session composer. In email sessions,
the toolbar sits above Cc. It also applies when writing internal comments.
This setting is off by default: the toolbar appears when you select text. Your choice
is saved for your account across browsers and does not affect teammates. It applies to
session replies and comments, not the New Session dialog. Available formatting and
delivery behavior remain the same for each channel.
Enable **Macros button** under **Inbox** to add a macros button to the session composer
toolbar. It opens a searchable list of your macros with a preview of the
highlighted one; choosing a macro inserts it where your cursor is. While the button is on,
macros no longer appear in the **/** menu.
This setting is off by default: macros are inserted from the **/** menu. Your choice is
saved for your account across browsers and does not affect teammates. It applies to
session replies and comments, not the New Session dialog.
### Translate messages in your view
Open the session's **More options → Translation → Target language** menu to choose
which language you read. Under **Display style**, choose **Show translation beneath
original content** or **Only show translation**. These settings affect your dashboard
view; they do not rewrite stored messages or change outbound translation settings.
Translated message bodies preserve paragraphs, line breaks, emphasis, links, lists,
and nested quotations. In email sessions, quoted history stays behind **•••** in
both the message view and the email experience. Expand it to read the history;
its original text remains visible while its translation loads. A failed history
translation leaves the translated message body visible and labels the history as
original. If only the history is translated, only that section is labeled as a
translation. If translation is unavailable, the original content remains readable.
In the email experience, **Only show translation** displays one translated email
once it is ready, retaining its inline images, layout, and quoted-history control.
**Show translation beneath original content** displays both versions. Attachments
remain available below the email; inline images are not repeated as attachments.
The original stays visible while translation is loading or unavailable. Text inside
image files is not translated.
### Macro options
A macro can carry up to 3 options the customer taps instead of typing, such as **Yes** and
**No** on a consent question. Add them in **Settings → Macros** when you create or edit an
org-wide macro, or set them through the API (`options` on `POST /macros` and
`PATCH /macros/{id}`) or the Companion. Each label is up to 20
characters. Personal macros can't have options; a personal version of an org-wide macro sends
the org-wide macro's options.
Each option does one of two things when tapped:
* **Send as reply** — the label reaches the session as the customer's message and is
handled like anything they type.
* **Trigger workflow** — the tap runs your **Macro Option Clicked** workflows for that macro
and the AI doesn't reply. Branch on **Option ID** or **Option Label** in the workflow.
This works whoever owns the session. If no active workflow listens for the macro, the tap
is handled like a message the customer typed.
Only the first tap on the newest message with options counts. A second tap, a tap on an
older message's options, or a tap on a closed session arrives as a normal message and runs
nothing. The message in the
session timeline shows the options that were sent and marks the one the customer picked.
The **/** menu, the macro picker and the composer show a macro's options before you send it;
remove them from the composer to send the message without options.
Options are sent as buttons on the web widget, WhatsApp, Messenger and Instagram, and delivered
to your own client on API sessions (see [Send a message](/api-reference/chat-sessions/send#option-taps)).
A website running an older widget version shows the message without the buttons; the customer
can still type their answer. On other channels, including sessions linked to HubSpot or
Intercom conversations, only the message is sent, and the inbox tells you so when you insert
the macro.
The first message of a new session is always sent without options. On WhatsApp, a message with
options is limited to 1,024 characters.
### FAQ
Periodic refreshes of the session list and selected session details pause while the browser
tab is hidden. They refresh when you return to the tab. Live session updates can still arrive
while the tab is in the background.
Check the assignee in the session header and your current Inbox filters. When
Team in the loop applies, replying keeps the session assigned to AI. If you
took over, find it among sessions assigned to you. For other sessions, the
existing assignment behavior still applies.
If you reply to a phone conversation using text, Open will send this text message to the customer's phone number.
## Available APIs
Open provides top-of-the-line APIs for developers to build on top of our platform, including inbox APIs.
List and manage support requests and conversations from web, phone, and email channels in a
single place.
This documentation is built and hosted on [Mintlify](https://mintlify.com), a developer documentation platform.